Search This Blog

Vision Board Making ❤


The inner child in me LOVED making my vision board! Paper, scissors, glue, stickers, photos, card stock, glitter...what's not to be excited about?! If you have never heard of a vision board before, it is basically a board designed around everything you aspire to achieve in your life. Its purpose is to give you a constant visual reminder of the goals and dreams you have set out to accomplish. Your vision board should reflect your own personal style, therefore making it, will be pretty simple. Here's some suggestions: 
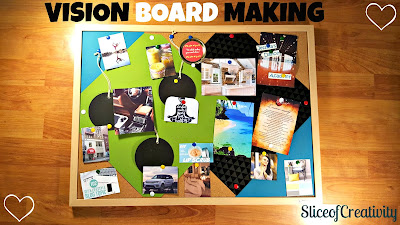
 I used a bulletin board, but you can really use anything that will serve the same purpose, such as a white board with magnets, projects board, etc.

* PHOTOS. Print those bad boys out, and cut them out to different sizes!


* PINS if you are using a bulletin board, GLUE if you are using a project board, or magnets if you are using a white board.


There is no set instructions on how to make a vision board really, since it should be extremely personal, but after making a couple of my own I just wanted to share what I believe are the 3 most important components, and what will give it the most substance!

 CHOICE OF PHOTOS.

1. Make sure to choose photos that really represent any ambitions that you have. These photos should depict anything and everything you desire. Whether it's a material object such as a big home, or new car, or something emotional such as working on gaining more confidence...PRINT IT OUT! Quotes work great as well! My boyfriend had a great idea of putting a blank cheque on his. Which you can find online here: 
http://www.thesecret.tv/gifts-for-you/the-secret-check/. It is presented as a cheque from the Universe...PS. If you have never read The Secret, I highly recommend it! But the bottom line is, if it is something you want to work towards it should be on your board!

2. SIZE OF PHOTOS! You may think this makes no difference...but it does. Try to choose a couple of the photos that mean a little more to you, or even the ones that you feel you would like to work towards before the others, and print them larger! When you gaze over to your board the bigger photos will stand out more than the smaller ones, these should be the ones that pull on your heart strings...your goals that you just NEED to achieve...and you will ;)


3. PLACEMENT!Placement is one of the most important components of making your vision board. Make sure that wherever you choose to hang it is easily visible in your day to day life. I usually put mine directly across from my bed. This way as soon as I wake up in the morning it is the first thing I see, and a constant reminder of what I need to work towards as I start my day. Whether you're going to place it across from your bed or beside, just make sure it is the first thing you see each morning when you wake up and the last thing you see each night before you go to bed.


You're on your way to chasing your wildest dreams! 
Xo 💗

DIY Winter Centrepiece!

Just like most of us, one of my favourite times of the year is Christmas! Ahh...the baking, the snow falling, the lights, the drink menu at Starbucks, and of course the decorating! But there is nothing worse then taking down your heap load of Christmas decorations to leave your house looking empty...womp womp! After removing my Christmas centerpiece off of the dining table, it just looked so lifeless. So I started crafting and put together this extremely easy centerpiece! Although this could work for Christmas as well, it has the perfect "cool winter" theme to highlight your table for January. Below you can find a list of all the materials you will need to make this!

PS. All of the following materials can be purchased at your local dollar store.


* GLITTER (3-4 PACKS)
*WHITE GLUE (1)
* MEDIUM SIZE PAINT BRUSH (1)
* ARTWORKS STONE PEBBLES (2 PACKS)


* GLASS VASE/JAR


* HANDFUL OF BRANCHES


LETS GET MESSY!


OKAY...First off, making this can get a little messy, but super fun! So make sure to lay out some newspapers or garbage bags on a large flat surface.


1. Take 1 branch from your handful and paint over with the white glue. Be sure to hold from the bottom and cover everything but the bottom, as you will need this part to hold the branch in place.


2. After covering the entire branch with glue, hold the branch just above your work surface and sprinkle over with the glitter, rotating through to make sure the entire branch is covered. When finished, place aside to dry. 


3. Repeat steps 1 and 2 for all of your branches, Once they are all done leave aside to dry for about 3 hours.


** Make sure to scrape up all the glitter that has fallen down to your table and fill back into the container as you go...trust me, this will save you A LOT of glitter!


4. Grab your stone pebbles, and pour into your glass vase/jar, until half way full.


5. Once your branches are dry, glue and glitter the bottom of each branch. Set aside and let dry for 1 hour.


6. After drying, shake off any access glitter from your branches, and carefully place branches in between your stone pebbles in your vase.


ALL DONE! You now have a beautiful winter centerpiece to brighten up any table! And the best part? You made this for under $15!


ALL NATURAL Lip Scrub

After years of running to the drug store
for all of my beauty essentials, I have learned what I want to spend my hard earned money on, and what I would just prefer to make in the comfort of my own kitchen. For as long as I can remember I have always had extremely sensitive skin, and have not had the best experiences with generic beauty products from the drugstore (which are often times filled with ingredients we can not pronounce, and are not exactly added for their health benefits). Hence my reason for making some of my own beauty products with all natural ingredients!

This one is one of my all time favourites, and is SO simple to make! With a 3 ingredient list, this scrub will leave your lips feeling super soft, and have you ready for your next date night ;)

What you need:


- 2 Tbsp Organic extra virgin coconut oil

- 1 Tbsp All natural cane sugar

- 1 Tsp Organic honey

- Small glass jar (found mine at the one and only...dollar store!)

Let's get mixing:

1. Lay out a cutting board, silicone spatula (or butter knife), teaspoon, and tablespoon.
2. Scoop out coconut oil, and place in the middle of the cutting board.
3. Add the cane sugar on top on the coconut oil
4. Add the organic honey on top of the sugar and coconut oil.
5. Using your silicone spatula fold the ingredients over and repeat until they are well combined (Scraping off the sides as you go.)
6. Once your scrub is evenly mixed together scoop into your glass jar and its a wrap!

That's how simple this is to make! Enjoy those super soft lips!

*Note: Try to keep this scrub in a cool, dry place to prevent the coconut oil from liquefying. 


Custom DIY Jewlery Hanger

I don't know about all of you...but I was so sick and tired of fighting with all of my tangled jewelry! So I got a little crafty one day and decided to put together this Custom DIY Jewelry Hanger! Ready for the best part? EVERY product used to make this can be purchased at your local dollar store (secretly one of my favourite stores to shop at!). Trust me this gets even better...all you need to make this beautiful piece is 3 products:

- Any standard size picture frame (try to find one with a hook on the back to hang on a wall).


- 1 pack of metal all purpose hooks (number of hooks depends on how much jewelry you will be hanging, I only used 7).

- A Glue gun and glue sticks.

What to do:

1. Start by flipping your picture frame face side down. 
2. Lay out your hooks so that you can see how much space you would like in between each one
3. Start gluing! Apply a generous dab of glue to the top of each hook and hold down in place at the back of the picture frame.
4. Once the glue is dried, you can flip over your frame and voila! You have a beautiful hanger for your necklaces and bracelets. 

* Please note this is not equipped to handle heavy accessories. So try to stick with light weighted necklaces and bracelets.

Keep in mind when making this product, there are so many different styles of frames and hooks at the dollar store...Don't be afraid to get creative! Once you are all done, find a nice place on your wall or inside a closet to hang this, and you can say goodbye to those days of fighting with all your tangled jewelry!